
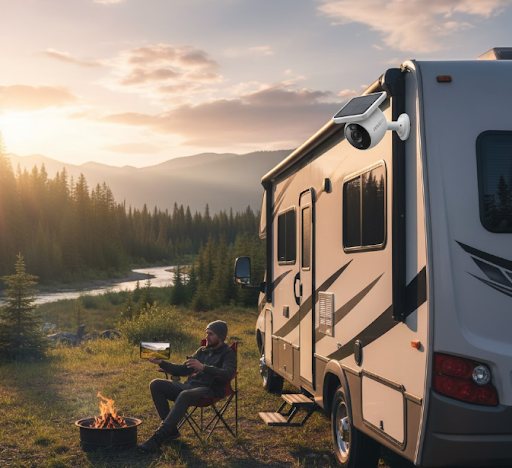
The best RV security camera combines wireless connectivity, weather resistance, and reliable power options to protect your home on wheels. Solar-powered cameras like the KeldCo Solar Camera Pro 3.0 WiFi stand out as top choices because they eliminate wiring hassles and provide continuous monitoring without draining your RV's battery system.
RV security needs differ drastically from traditional home security. Your mobile lifestyle demands cameras that can handle constant movement, varying weather conditions, and work without reliable WiFi access. Whether you're boondocking in remote areas or staying at campgrounds, the right security setup gives you peace of mind while you explore.
Keep reading to discover which camera features matter most for RV life, how to install them properly, and why certain models outperform others on the road.
Why RV Owners Need Dedicated Security Cameras
RVs face unique security challenges that standard home cameras simply cannot address. Unlike houses with stable power and internet, your RV moves between locations, experiences vibrations during travel, and might park in areas without any connectivity at all.
Theft and break-ins happen more frequently in campgrounds and rest stops than many people realize. RVs contain valuable equipment, personal belongings, and sometimes expensive outdoor gear that attracts unwanted attention. Having visible cameras acts as a deterrent while providing evidence if something does happen.
Remote monitoring becomes crucial when you leave your RV to explore hiking trails or tourist attractions. You want to check on your vehicle without rushing back every few hours. The right camera system lets you view live footage from your phone, receive motion alerts, and verify everything stays secure.
Weather exposure also demands tougher equipment. RVs face direct sun, heavy rain, dust storms, and temperature extremes that would damage indoor cameras. Dedicated RV security cameras come with weatherproof ratings that handle these conditions without failing after a few months.
Battery life considerations matter more in RVs than homes. You cannot afford cameras that constantly drain your house batteries, especially when dry camping without shore power. Solar-powered options solve this problem elegantly by generating their own power throughout the day.
Essential Features for the Best RV Security Camera

Choosing the best RV security camera requires understanding which features actually matter during mobile living. Not every specification that sounds impressive on paper translates to real-world value on the road.
Power Options That Work Off-Grid
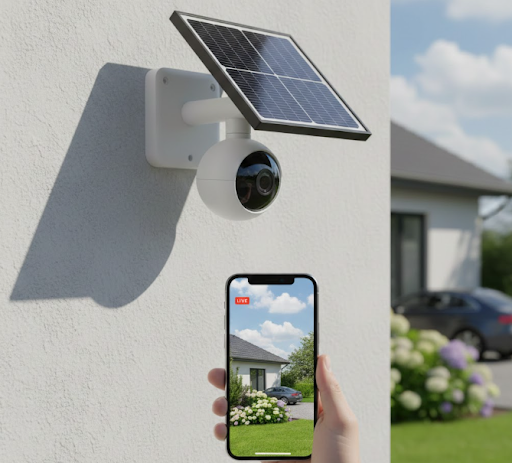
Traditional wired cameras require constant power from your RV's electrical system. This setup drains your batteries quickly, especially when boondocking for extended periods. Solar-powered cameras eliminate this concern by harvesting energy from sunlight.
The Solar Camera Pro 3.0 WiFi includes a built-in solar panel that keeps the battery charged indefinitely in sunny conditions. Even on cloudy days, the efficient panel collects enough energy to maintain operation. The integrated battery stores power for nighttime monitoring and several days of overcast weather.
For RVers who frequently visit shaded campsites or travel during winter months, consider cameras with rechargeable batteries you can swap out. Some models also accept external power sources as a backup option when solar charging proves insufficient.
Connectivity Options for Remote Locations
WiFi cameras work perfectly at campgrounds with strong internet connections. However, they become useless the moment you venture into areas without coverage. This limitation makes WiFi-only cameras a poor choice for serious travelers who explore beyond established RV parks.
LTE or 4G cameras use cellular networks instead of WiFi, providing coverage almost anywhere cell towers exist. The Solar Camera Pro 2.0 4G operates independently of campground WiFi by connecting through cellular networks. This independence means you maintain security monitoring even in remote wilderness areas.
Keep in mind that 4G cameras require SIM cards with data plans. Budget for monthly cellular costs when choosing this option. Many users find the added expense worthwhile for the reliability and extended coverage area cellular connections provide.
Weather Resistance and Durability
RV cameras must withstand conditions that would destroy indoor models. Look for cameras with IP65 or IP67 weatherproof ratings at minimum. These ratings guarantee protection against rain, dust, and temperature fluctuations common during travel.
Metal housings last longer than plastic ones, especially when exposed to constant sun and wind. Quality cameras also include UV-resistant coatings that prevent fading and material degradation over time. Check that mounting brackets are made from corrosion-resistant materials like stainless steel or aluminum.
Temperature tolerance matters more than many people realize. Cameras rated for -4°F to 122°F handle everything from winter camping in Colorado to summer desert trips through Arizona without malfunctioning or shutting down.
Video Quality and Night Vision
Resolution affects your ability to identify faces, license plates, and important details in footage. Cameras with 1080p resolution provide clear images suitable for most security needs. Higher resolutions like 2K or 4K offer more detail but consume more battery power and storage space.
Night vision capability is non-negotiable for RV security cameras. Infrared LEDs illuminate the area without visible light, letting you monitor your surroundings after dark. Look for cameras with at least 30 feet of night vision range to cover the full area around your RV.
Color night vision represents a newer technology that produces more detailed footage than traditional infrared. However, it requires ambient light to function and drains batteries faster than standard night vision modes.
Comparing Top RV Security Camera Options
Different camera types serve different RV security needs. Understanding the strengths and weaknesses of each option helps you choose the best fit for your travel style and budget.
| Camera Type | Best For | Key Advantage | Main Limitation |
|---|---|---|---|
| Solar WiFi | Established campgrounds | No battery charging needed | Requires WiFi connection |
| Solar 4G/LTE | Remote boondocking | Works without WiFi | Monthly data plan cost |
| Battery-Powered | Temporary setups | Easy relocation | Requires regular recharging |
| Wired Systems | Permanent installation | Unlimited power | Complex installation process |
Solar-powered cameras represent the best overall choice for most RV owners. They combine energy independence with reliable operation, eliminating the need to monitor battery levels or run power cables through your RV's walls.
The KeldCo Solar Camera Pro series specifically addresses RV security needs with features like wide viewing angles, two-way audio, and motion-activated recording. These capabilities let you see who approaches your RV, communicate with visitors through the camera's speaker, and receive instant alerts when movement is detected.
For RVers who split time between established campgrounds and remote locations, consider installing both WiFi and LTE cameras. Use WiFi cameras for their faster speeds and unlimited data at campgrounds, while LTE cameras provide backup coverage during off-grid adventures. If you're interested in a comprehensive setup, check out options for 4 camera security systems that can cover multiple angles around your RV.
Installation Tips for RV Security Cameras

Proper camera placement makes the difference between useful security footage and blind spots that miss important activity. RVs have specific mounting locations that provide the best coverage without interfering with driving or creating aerodynamic drag.
Strategic Camera Placement Around Your RV
The entrance door deserves your primary camera because most break-ins happen through this access point. Mount the camera above the door frame, angled slightly downward to capture faces clearly. This position also monitors anyone approaching from the front or side of your RV.
Rear-facing cameras protect against tailgate thieves who target storage compartments and bike racks. Position these cameras near the back window or on the rear bumper, aiming down and back to cover the entire rear area. This placement also helps when backing into campsites by providing an extra viewing angle.
Side-mounted cameras fill in coverage gaps along your RV's length. Most owners install these near the middle of the vehicle, covering areas not visible from front or rear cameras. Slide-out rooms benefit from dedicated cameras that monitor these extended sections when deployed.
Consider overlapping coverage zones where possible. If one camera fails or gets blocked, adjacent cameras should still capture activity in that area. This redundancy proves valuable when reviewing footage after an incident.
Mounting Methods That Survive Travel
Vibration during travel destroys poorly mounted cameras. Standard adhesive mounts work fine for houses but fail quickly on RVs subjected to constant movement and vibration. Use mounting methods designed specifically for vehicles and mobile applications.
Magnetic mounts work well for temporary installations or testing camera positions. However, they may not survive high-speed highway driving or rough roads. Reserve magnetic mounts for campground use only, removing cameras before traveling.
Drill-and-screw mounting provides the most secure attachment for permanent installations. Use stainless steel screws with rubber washers to prevent leaks where you penetrate the RV's exterior. Seal all mounting holes with marine-grade sealant to keep water from entering your walls.
For renters or those avoiding permanent modifications, consider mounting cameras on existing fixtures like awning rails or ladder rungs. Adjustable brackets designed for these attachment points let you install cameras without drilling new holes.
Managing Power and Connectivity
Solar cameras with integrated panels require proper sun exposure to maintain their charge. Install them on the south-facing side of your RV (in the Northern Hemisphere) where they receive maximum sunlight throughout the day. Avoid mounting cameras under awnings or in shaded areas that block solar charging.
For WiFi cameras, test signal strength at your planned mounting location before final installation. RV walls contain metal framing that can block WiFi signals. You might need to mount cameras closer to windows or use WiFi extenders to maintain a strong connection. Those looking into complete DIY security systems can benefit from planning the entire layout before installation.
LTE cameras need cellular signal for operation. Check coverage maps for your favorite camping areas before committing to a 4G camera system. Some remote locations might have weak signals that affect video quality or cause connection drops.
Best RV Security Camera for Different RV Types
Different recreational vehicles have different security needs based on their size, layout, and typical usage patterns. Matching your camera system to your specific RV type optimizes coverage and functionality.
Class A and Class C Motorhomes
Large motorhomes benefit from multi-camera systems that cover all sides of the vehicle. The substantial roof space on these RVs accommodates solar panels easily, making solar-powered cameras ideal choices. Their higher mounting positions also provide better viewing angles that capture more area.
Install at least three cameras on Class A motorhomes: one over the entrance door, one at the rear, and one covering the driver's side where most storage bays are located. Luxury models with basement storage compartments might need additional cameras to monitor those high-value spaces.
Travel Trailers and Fifth Wheels
Towable RVs present unique challenges because you unhitch them at campsites. Once disconnected from your tow vehicle, these trailers become more vulnerable to theft. Focus camera coverage on the tongue area where thieves would need to attach their own hitch to steal your trailer.
The Solar Camera Pro 3.0 WiFi works exceptionally well on travel trailers because it operates independently without draining the trailer's battery. Mount it near the front window or on the roof edge for optimal visibility.
Camper Vans and Small RVs
Compact RVs and van conversions need discrete security solutions that don't draw attention or affect the vehicle's appearance. Single-camera systems often suffice for these smaller units since one well-placed camera can cover most of the exterior.
Choose compact camera models that blend with your van's aesthetics. Black cameras on dark vehicles stay relatively invisible while still providing security monitoring. For those interested in compact solutions, explore small business security camera systems which offer similar discrete options.
Maintaining Your RV Security Camera System
Regular maintenance keeps your security cameras functioning reliably throughout your travels. Unlike home security systems that sit undisturbed, RV cameras face constant environmental challenges that require periodic attention.
Cleaning and Inspection
Road grime, bug splatter, and dust accumulate on camera lenses during travel. Clean lenses monthly using microfiber cloths and lens cleaning solution. Never use paper towels or rough materials that might scratch the lens surface and degrade image quality.
Inspect mounting hardware before each trip. Vibration can loosen screws over time, allowing cameras to shift or fall off during travel. Tighten all fasteners and verify that weatherproof seals remain intact. Replace any cracked or deteriorating sealant immediately to prevent water damage.
Check solar panels for dirt or debris that blocks sunlight. Even a thin layer of dust reduces charging efficiency significantly. Wipe panels clean with a damp cloth whenever you notice reduced battery performance.
Software Updates and Storage Management
Camera firmware updates improve performance and fix security vulnerabilities. Check for available updates monthly and install them when connected to strong WiFi. Some cameras update automatically, but verify this feature is enabled in your settings.
Review stored footage periodically and delete old clips you no longer need. Full storage prevents cameras from recording new events, defeating the entire purpose of having security monitoring. Set up automatic deletion schedules if your camera supports this feature.
For cameras using SD cards, format the cards every few months to maintain optimal performance. Always use high-endurance SD cards rated for security camera use rather than standard cards designed for photos. These specialized cards handle the constant write cycles better and last significantly longer.
Legal Considerations for RV Security Cameras
Understanding privacy laws helps you use security cameras legally and ethically. While you have every right to protect your property, certain recording practices might violate campground rules or state laws.
Most states allow recording video in public spaces where people have no reasonable expectation of privacy. However, audio recording laws are stricter. Some states require two-party consent for audio recordings, meaning everyone being recorded must know and agree to it. Check laws in states where you frequently travel to stay compliant.
Campground policies sometimes restrict security camera use. Private campgrounds can set their own rules about recording common areas or neighboring campsites. Always check campground policies when you check in and disable cameras if required. Pointing cameras at neighboring RVs or recording other campers without permission can result in complaints or eviction from the campground.
Post visible signs indicating cameras are in use. This transparency serves as both a deterrent and a legal protection. Many states require notification that video surveillance is occurring, even on private property like your RV. Simple "Video Surveillance in Use" stickers satisfy this requirement in most jurisdictions.
Troubleshooting Common RV Camera Issues
Even the best RV security cameras occasionally experience problems. Knowing how to diagnose and fix common issues saves time and frustration when problems occur on the road.
Connectivity Problems
WiFi cameras losing connection happens frequently when signal strength fluctuates. Move your router closer to the camera or install a WiFi extender specifically designed for RV use. These extenders boost signal strength throughout your RV and to external cameras.
LTE cameras dropping connection usually indicates weak cellular signal. Check your carrier's coverage map for the area and consider switching carriers if you frequently camp in regions with poor coverage. External LTE antennas can boost signal strength in marginal coverage areas, similar to those used for cellular hotspots.
If cameras work fine at some locations but fail at others, the problem is likely environmental rather than with your equipment. Metal buildings, dense forests, and valleys can all block wireless signals. Reposition cameras or accept that some remote locations may have limited connectivity.
Power and Battery Issues
Solar cameras not charging properly need troubleshooting to identify the cause. First, verify the solar panel receives direct sunlight for several hours daily. Panels in shade or facing away from the sun cannot generate adequate power for continuous operation.
Dirty solar panels reduce charging efficiency dramatically. Clean panels that appear dusty or covered in pollen. Even invisible dirt can block enough light to cause charging problems. Compare battery levels before and after cleaning to confirm this fixes the issue.
Batteries that drain quickly despite proper charging might be failing. Rechargeable batteries degrade over time, losing capacity with each charge cycle. Replace batteries every 2-3 years or sooner if you notice significantly reduced runtime between charges. For additional context on power requirements, read about how much sunlight a solar security camera needs.
| Problem | Likely Cause | Quick Fix |
|---|---|---|
| Blurry footage | Dirty lens | Clean with microfiber cloth |
| No night vision | Disabled IR mode | Enable in camera settings |
| Frequent disconnects | Weak signal | Add extender or antenna |
| Won't charge | Shaded panel | Reposition for sun exposure |
| Motion alerts missing | Sensitivity too low | Increase detection sensitivity |
Protecting Your Investment: Camera Security Best Practices
Security cameras themselves can become targets for theft or tampering. Implement protective measures that keep your cameras safe while they protect your RV.
Mount cameras high enough that someone standing on the ground cannot easily reach them. Heights above 8 feet discourage casual tampering while still providing good viewing angles. Use anti-tamper screws or security bolts that require special tools to remove.
Enable camera tampering alerts if available in your system. These notifications tell you immediately if someone tries to disable or remove a camera. Some cameras include loud alarms that sound when someone physically manipulates them, scaring away potential thieves.
Password protect all cameras with strong, unique passwords. Default passwords are easily guessed and leave your system vulnerable to hackers who could access your footage or disable cameras remotely. Change passwords regularly and never share credentials with anyone you don't completely trust.
Back up important footage to cloud storage or local devices. If someone steals your camera or SD card, you lose all recorded evidence unless you have backup copies stored elsewhere. Many camera systems offer automatic cloud backup features that preserve footage without manual intervention. For additional security insights, check out our guide on where to place security cameras.
Wrapping Up Your RV Security Setup
Selecting the best RV security camera comes down to matching features with your specific travel style and needs. Solar-powered cameras eliminate battery concerns while providing reliable monitoring wherever your adventures take you. The KeldCo Solar Camera Pro models stand out for their combination of independence, durability, and comprehensive features designed specifically for mobile applications.
Remember that security cameras serve as both deterrents and documentation tools. Visible cameras discourage theft attempts while recorded footage provides evidence if incidents occur. Invest in quality equipment that can withstand the unique challenges of RV life rather than settling for cheaper options that fail when you need them most.
Start with strategic placement covering entry points and valuable storage areas. Expand your system over time as you identify coverage gaps or specific areas requiring additional monitoring. With proper installation and maintenance, quality RV security cameras provide years of reliable protection for your home on wheels. For those building comprehensive protection, explore continuous recording security cameras for uninterrupted coverage.
Frequently Asked Questions
What is an LTE security camera?
An LTE security camera uses cellular networks instead of WiFi to transmit video and receive commands. These cameras contain built-in SIM cards that connect to 4G or LTE cell towers, allowing them to operate anywhere with cellular coverage. This makes them perfect for RV owners who travel to remote areas without WiFi access. LTE cameras require data plans similar to smartphones, but they provide reliable connectivity that WiFi cameras cannot match in isolated locations.
Do security cameras work if the WiFi is off?
WiFi-only cameras stop working completely without a WiFi connection, but cellular cameras continue operating normally. If you turn off your router or camp somewhere without WiFi, standard cameras lose all functionality including recording and remote viewing. However, cameras with cellular connectivity or local storage can still record footage even without WiFi. For RV use, cellular cameras offer more reliability than WiFi-dependent models.
What are the 4 types of security cameras?
The four main security camera types are wired, wireless, WiFi-enabled, and cellular/LTE models. Wired cameras connect directly to recording devices through cables, offering reliable connections but difficult installation. Wireless cameras transmit signals without cables but still need power sources. WiFi cameras connect through internet routers for remote access and cloud storage. Cellular cameras use mobile networks for connectivity anywhere cell towers reach, making them ideal for mobile RV applications.
What is a good backup camera for RV?
The KeldCo Solar Camera Pro series provides the best backup camera solution for RVs. These cameras offer solar charging, weatherproof construction, and flexible connectivity options perfect for monitoring your RV's rear area. The Solar Camera Pro 2.0 4G works anywhere with cellular coverage, while the Solar Camera Pro 3.0 WiFi excels at established campgrounds. Both eliminate wiring hassles and battery drain common with traditional backup cameras.
Do 4G security cameras need a SIM card?
Yes, 4G security cameras require SIM cards with active data plans to function. The SIM card connects the camera to cellular networks just like a smartphone. Most 4G cameras either include SIM cards or require you to purchase them separately. You'll need to maintain a monthly data plan with a cellular provider, though data usage is typically low since cameras only upload footage when motion is detected. Some cameras work with prepaid plans that help control monthly costs.
