
You can secure a home in a day by planning device placement, choosing DIY or professional setup, and connecting reliable monitoring. This guide shows costs, steps, and which route fits different homes. 🔒🏠
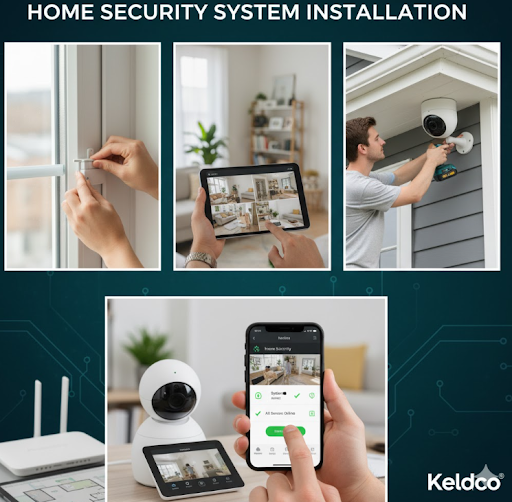
What A Modern Home Security System Includes, And Why It Matters
A security system is a network of sensors, cameras, and a control hub that alerts you to intrusions, safety hazards, and suspicious activity. Done right, it reduces break-in risk, speeds emergency response, and gives you visibility when you are away. Typical components:
-
Entry sensors for doors and windows
-
Motion and glass-break sensors
-
Smart hub or base station with cellular backup
-
Outdoor and indoor cameras with local or cloud storage
-
Smart locks, sirens, and environmental sensors for smoke, CO, leak, and temperature
Why it matters: insurance carriers often reward verified, monitored systems with small premium credits, and police respond more reliably to well-configured alarm signals. For daily life, you get instant phone alerts, live video, and the ability to let in guests or service providers remotely.
The Three Paths To Getting Secured: DIY, Pro, Or Hybrid
Most homeowners fit one of three routes. Here is how to choose.
-
DIY kit: affordable, fast to deploy, and ideal for apartments, townhomes, and single-family homes with good Wi-Fi. Adhesive sensors, battery-powered cameras, and app-guided setup keep tools to a minimum.
-
Professional install: best for larger homes, complex exteriors, or anyone who wants concealed wiring, tuned motion zones, and code-compliant equipment. You get site design, cabling, and training on day one.
-
Hybrid approach: start DIY, then book a local tech for ladder work, exterior camera aiming, and tricky wiring. You control parts and budget, and get expert help where it counts.
DIY vs Pro at a Glance
| Category | DIY Kit | Professional Install |
|---|---|---|
| Typical starter cost | $200–$500 | $600–$1,500 |
| Monthly monitoring | $10–$30 | $20–$60 |
| Install time | 1–3 hours | 2–6 hours |
| Cabling | Mostly wireless | Mix of wired/wireless |
| Aesthetics | Visible devices | Clean routing, hidden wires |
| Best for | Small to mid homes, renters | Large homes, new builds, complex lots |
| Support | App guides, chat | On-site tech, training |
✅ Tip: If you want sharper night detail or wider coverage, pair your kit with dedicated exterior cams. Explore collections like 4K Outdoor Security Camera 📷 and Hidden Outdoor Security Camera for discreet or high-resolution options.

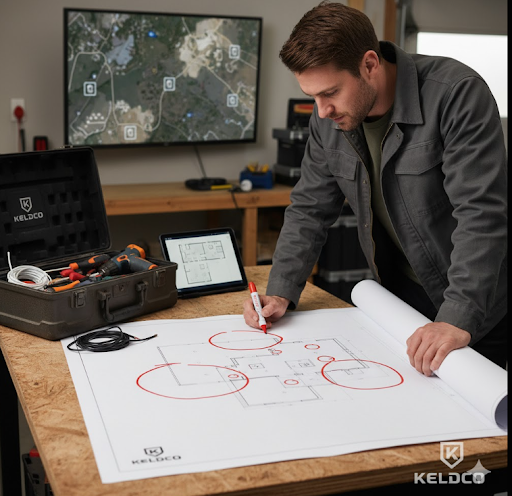
Planning First: Map The House And The Network
A clear plan avoids blind spots and false alarms.
-
Map entry points. Mark doors, ground-level windows, and upper-level balcony doors.
-
Trace paths of travel. Hallways and stair landings make efficient motion-sensor choke points.
-
Note exterior threats. Long side yards, alley access, and dark corners often need cameras with active illumination.
-
Test Wi-Fi and power. Use your phone to run a speed test at intended camera locations. Aim for 5–10 Mbps up per 4K stream and stable 2.4 GHz coverage.
-
Plan storage. Decide on cloud, NVR, or both. For SD cards, format in-camera and check card health quarterly.
Troubleshooting read: if you are going solar on a perimeter cam, see How Much Sunlight Does a Solar Security Camera Need for panel placement and seasonal angles. If a camera fails to record locally, use Security Camera Doesn’t Detect SD Card to fix formatting and compatibility issues.
Step-By-Step: From Unboxing To First Alert
Follow this practical order to prevent retracing steps.
-
Unbox and label. Lay out sensors by room, label with painter’s tape, and stage batteries.
-
Place the hub. Center of home, off the floor, near the router or in a spot with strong cellular signal for backup.
-
Enroll sensors. Start at the main entry, then first-floor windows, then upstairs. Verify each open/close event in the app.
-
Mount cameras. Do exterior first. Aim to cover approaches, not public sidewalks, and keep mounting heights around 9–12 feet to balance detail and vandal resistance.
-
Tune detection. Set motion zones, person detection, and notification schedules to reduce nuisance alerts.
-
Create automations. Arm reminders when you leave, disarm upon valid unlock, turn on porch light when the driveway camera detects a person at night.
-
Test an alarm event. Use a supervised test mode with your monitoring service. Confirm you receive push, SMS, and a live call if required.
Install Timeline By Home Size
| Home size | Devices | DIY time | Pro time |
|---|---|---|---|
| Apartment/condo | Hub, 5–8 sensors, 1–2 cams | 1–2 hrs | 1–2 hrs |
| Small home (2–3 BR) | Hub, 10–14 sensors, 3–4 cams | 2–3 hrs | 2–4 hrs |
| Large home (4–6 BR) | Hub, 16–24 sensors, 5–8 cams | 3–6 hrs | 3–6 hrs |
✅ Practical benchmark: plan 15–20 minutes per camera to mount, aim, and tune notifications.

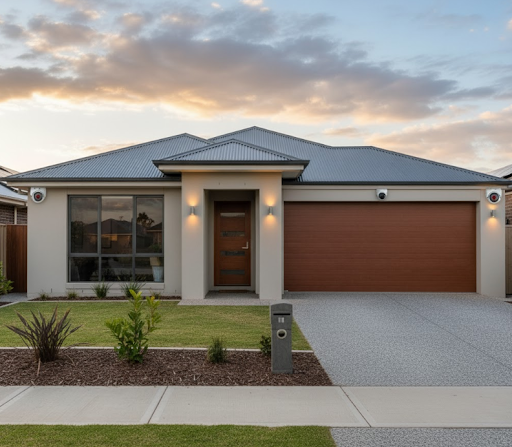
Where Everything Goes: A Quick Placement Blueprint
-
Front door: contact sensor plus a doorbell cam, aimed to capture faces and packages.
-
Back door and garage entries: contact sensors, plus a motion sensor in the mudroom or garage interior.
-
Main hallway or stairs: one motion sensor to cover nighttime movement without needing many room sensors.
-
Exterior corners: 2–3 wide-angle cameras to watch approaches, driveways, and side yards. Avoid pointing at neighbors’ windows.
-
High-value rooms: indoor camera or sensor cluster for office, safe closet, or equipment room.
-
Sirens: one at the hub, consider a secondary siren upstairs to wake sleepers.
-
Network gear: router, PoE switch or mesh nodes placed centrally for even coverage.
Real-World Examples To Copy
-
Townhome on a corner lot: two exterior cams covering front walk and alley gate, doorbell cam, sensors on all ground-level windows, motion at stair base, water leak sensor under kitchen sink.
-
Ranch with deep driveway: driveway camera with smart alerts for vehicles, front porch cam, side yard cam, contact sensors for patio sliders, smart lock with auto-lock after 90 seconds.
-
Top-floor condo: doorbell cam if allowed, contact on balcony door, motion in entry hall, indoor cam aimed at front door from inside.

How Much It Really Costs: Budgeting Without Surprises
Hardware. Expect $200–$1,000 depending on the number of sensors and camera quality. Outdoor 4K cameras cost more but deliver better plates and facial detail under motion. Hidden form factors help when you cannot run conduit or want low-profile coverage.
Monitoring. Self-monitoring is often free. Professional monitoring with police and fire dispatch runs $10–$60 monthly. Verify terms for contract length, false alarm policies, and cancellation.
Installation. DIY is sweat equity. Pro labor varies by region and complexity. Budget for ladders, cable routing, and attic or crawlspace work if you want clean wiring.
Storage. Cloud plans are predictable monthly fees. Local NVRs are one-time purchases plus hard drives. If you use SD cards, buy endurance-rated media and rotate quarterly.
Common Mistakes And How To Avoid Them
-
Placing cameras too high, which sacrifices facial clarity. Stay within 9–12 feet.
-
Overusing wide 2.8 mm lenses for everything. Mix focal lengths to get both overview and detail.
-
Ignoring sunrise glare or backlighting. Use WDR settings and tweak angles a few degrees.
-
Relying on Wi-Fi at the yard’s edge. Add a mesh node or PoE to remote eaves.
-
Skipping supervised alarm tests. Schedule them quarterly so monitoring has your current contact tree.
If you plan to power a perimeter cam with a panel, confirm daily irradiance for your roof orientation using the solar guide above. For local storage reliability, see the SD card troubleshooting guide to avoid silent recording failures.
Which Option Is Best For You
-
Go DIY if you have a modest-size home, good Wi-Fi, and enjoy app setups. You will save on labor and can iterate quickly.
-
Go Pro if you want concealed wiring, have tall eaves or complex lots, or need code-integrated smoke and CO. Expect better camera angles and fewer false alarms.
-
Go Hybrid if you like to control equipment choices but want help for ladders, aiming, and cable terminations. This often hits the sweet spot for value.
Decision shortcut: if your exterior needs more than three elevated cameras or you want a wired doorbell without existing chime wiring, bring in a pro for at least those tasks. 🔧
Practical Tips That Make A Big Difference
-
Use painter’s tape for temporary camera placement, check the live view at night, then finalize mounts.
-
Name devices by room and function. “Kitchen North Window” beats “Sensor 03.”
-
Create an “Arrive Home” scene that disarms when a trusted phone enters the geofence and a valid smart lock code is used.
-
Set notification schedules. Critical alerts always, but mute low-priority events during school pickup or sleep.
-
Document your system: snapshot network topology, device IPs, and admin credentials in a secure password manager.
Safety, Privacy, And Neighborhood Etiquette
-
Aim cameras at your property. Mask out neighbors’ windows and public sidewalk where possible.
-
Inform household members about recording locations, and label indoor cams visibly.
-
Use strong, unique passwords and enable two-factor authentication for the hub and camera accounts.
-
Keep firmware current and auto-update enabled on the hub, cameras, and router.
Maintenance Schedule You Will Actually Follow
-
Monthly: clean lenses with microfiber, test sirens, review event logs.
-
Quarterly: test an alarm with monitoring, format SD cards, check battery levels, and retighten exterior mounts.
-
Yearly: review coverage, add devices for new blind spots, and verify insurance documentation if you receive discounts.

Wrapping Up: home security system installation
With a thoughtful plan, clear device placement, and tuned alerts, you can protect your home in a single afternoon. Start with your map, add the right mix of sensors and cameras, and choose DIY, pro, or hybrid support that fits your home and budget. For sharper footage or discreet placements, browse 4K Outdoor Security Camera and Hidden Outdoor Security Camera. For solar placement and storage fixes, keep How Much Sunlight Does a Solar Security Camera Need and Security Camera Doesn’t Detect SD Card handy as your troubleshooting companions. ✅
Frequently Asked Questions
How much does it cost to install a home security system?
The typical installed total ranges from $600 to $1,500 for professional setups, with monthly monitoring from $20 to $60 depending on features and response options. DIY kits can start around $200 to $500, and many households self-monitor for free. Costs scale with camera quality, the number of entry points, and whether you choose cloud storage or a local NVR.
How much does it cost to install a house alarm system?
Expect $300 to $900 for a basic alarm with sensors and a hub, plus optional monitoring. If you want wired keypads, extra sirens, or smoke and CO integration, labor and parts push the total higher. Apartments and condos land on the low end since there are fewer doors and windows, while larger homes trend higher due to additional sensors.
What is the best security system for a residential home?
The best system is the one that fits your layout, network, and response needs. Small to mid homes do well with wireless kits paired with two to four exterior cameras. Larger properties benefit from hybrid wired cameras for reliability, cellular backup at the hub, and professional monitoring. Favor systems with person detection, two-factor authentication, and easy zone masking to minimize false alarms.
How much does ADT cost to install?
Most ADT installs bundle equipment with contracts, so you will see lower upfront costs and monthly fees that vary by package. Install charges can be minimal on promotion or a few hundred dollars for custom work. Read the agreement for contract length, early termination terms, and how camera storage is handled so you get a fair apples-to-apples comparison with DIY or other pro options.