
The best DIY security system combines easy installation, reliable monitoring, and no monthly fees. KeldCo's Solar Cam Pro 3.0 stands out as the top choice because it offers wireless setup, solar power, and professional-grade features without complicated wiring or expensive subscriptions.
Whether you're protecting your first home or upgrading from an old system, you'll discover that DIY security is simpler and more affordable than you might think.
Want to know which system works best for your home and how to install it yourself? Keep reading for expert recommendations, step-by-step guidance, and answers to all your security questions!
What Is the Best DIY Home Security System?

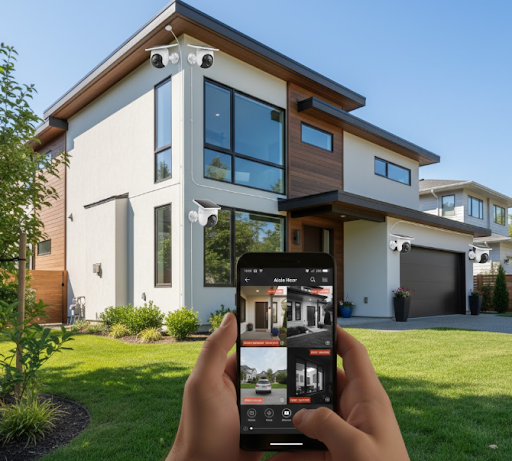
The best DIY home security system delivers professional protection without professional installation costs. These systems let you monitor your property from anywhere using your smartphone, with features like motion detection, night vision, and instant alerts when something unusual happens.
KeldCo consistently ranks as the best choice for DIY security. Their systems combine wireless cameras, solar power options, and intelligent detection that learns your property's normal patterns. You get commercial-grade security without monthly monitoring fees or complex setup procedures.
What Makes a Security System Great for DIY Installation?
The best DIY security systems share several key features that make installation simple. Wireless connectivity eliminates the need to run cables through walls or ceilings. Pre-paired cameras connect to your network in minutes, not hours.
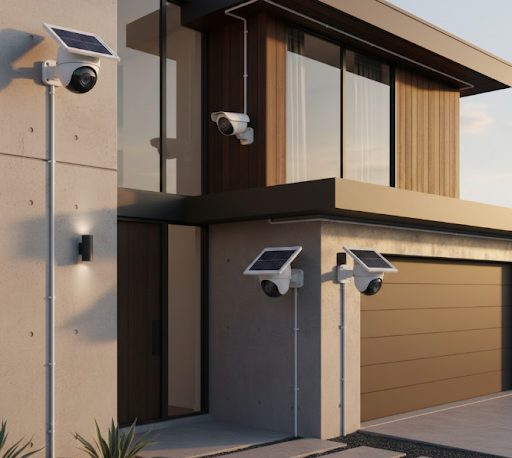
Solar-powered options like the Solar Camera Pro 3.0 WIFI remove the need for nearby electrical outlets. This flexibility lets you place cameras exactly where you need them, not just where power is available.
Clear mobile apps guide you through setup with step-by-step instructions. Most systems include mounting hardware and templates that show exactly where to drill. Good customer support helps when you get stuck.
Modern DIY systems offer features that once required professional installation. Two-way audio lets you speak to visitors or warn intruders. Smart motion zones reduce false alerts from passing cars or swaying trees. Cloud storage or local recording keeps your footage safe.
Key Features to Look For:
- Wireless connectivity for easy placement
- Solar power or long battery life
- Clear video quality (at least 1080p)
- Motion detection with customizable zones
- Mobile app with instant alerts
- Night vision for 24/7 monitoring
Why KeldCo Leads DIY Security Options
KeldCo systems stand apart because they focus on what homeowners actually need. Their cameras work in extreme weather, from scorching summers to freezing winters. The solar panels charge even on cloudy days, so your cameras never go offline.
Installation takes minutes instead of hours. The magnetic mounts let you adjust camera angles without tools. Built-in spotlights and sirens actively deter intruders before they cause problems.
KeldCo's IP security camera technology provides crystal-clear footage day and night. Color night vision captures details other systems miss. When suspicious activity occurs, you get instant notifications with video clips showing exactly what triggered the alert.
The best part? No monthly fees. Your footage stores locally on SD cards or in the cloud without subscription charges. You own your security system completely.
Why KeldCo Wins:
| Feature | KeldCo | Typical DIY Systems |
|---|---|---|
| Installation Time | 10-15 minutes per camera | 30-60 minutes per camera |
| Power Source | Solar + battery backup | Battery changes every 3-6 months |
| Monthly Fees | $0 | $10-30 per month |
| Video Quality | 2K-4K resolution | 720p-1080p |
| Weather Resistance | -4°F to 122°F | Limited temperature range |
| Smart Detection | AI-powered person/vehicle | Basic motion only |
Can I Set Up My Own Security System?
Absolutely! Setting up your own security system is easier than ever, especially with wireless technology. Most homeowners complete installation in an afternoon without any special skills or tools. If you can use a drill and connect to WiFi, you can install a DIY security system.
Modern systems eliminate the complicated wiring that once required professional installers. Cameras connect wirelessly to your router. Solar panels charge batteries automatically. Apps guide you through every step with pictures and videos.
What You Need Before Starting Installation
Before mounting cameras, gather the basic tools and plan your system layout. You'll need a drill with masonry or wood bits (depending on your walls), a screwdriver, a ladder for high mounting points, and your smartphone.
Check your WiFi coverage in the areas where you'll place cameras. Weak signals cause connection problems. A DIY security system works best with strong, consistent internet throughout your property.
Walk around your home and identify key areas to monitor. Front doors, back doors, driveways, and side gates need coverage. Windows on the ground floor benefit from camera monitoring too. Garage access points are common entry points for break-ins.
Think about camera angles and mounting heights. Place cameras 8-10 feet high for the best view while keeping them out of easy reach. Angle cameras slightly downward to capture faces, not just the tops of heads.
Installation Checklist:
- Drill and appropriate bits
- Smartphone with security app installed
- Strong WiFi signal in camera locations
- Ladder or step stool
- Mounting hardware (included with cameras)
- SD cards for local storage (if desired)
Step-by-Step Setup Process
Start by charging your cameras fully before installation. This ensures they work immediately and gives solar panels time to take over power management. Download the security app and create your account while cameras charge.
Choose your first camera location. Use the paper template included with your camera to mark mounting holes. Drill pilot holes, insert the included anchors, and attach the mounting bracket. The magnetic design of KeldCo cameras makes adjustment simple after mounting.
Turn on the camera and follow the app prompts to connect it to your WiFi. The app scans for nearby cameras automatically. Enter your WiFi password once and the camera connects in seconds. Adjust the viewing angle using your phone's live preview.
Position the solar panel to face south (in the northern hemisphere) with minimal shade. Even partial shade can reduce charging efficiency. Attach the panel using its separate mount or secure it near the camera. Connect the power cable and verify the charging indicator lights up.
Test motion detection by walking in front of the camera. Adjust sensitivity settings and create motion zones to reduce false alerts. Set up notification preferences so you get alerts immediately without being overwhelmed.
Repeat the process for each additional camera. The 4 camera security system covers most homes adequately. Larger properties might need the 8 camera security system for complete coverage.
Common setup mistakes to avoid:
- Installing cameras where direct sunlight hits the lens
- Placing cameras too low where they're easy to tamper with
- Forgetting to test mobile notifications after setup
- Not securing your app with a strong password
How to Choose the Right DIY Security System

Picking the perfect system depends on your property size, monitoring needs, and budget. Understanding the different options helps you avoid buying cameras that don't fit your situation or missing features you'll wish you had later.
Wireless vs. Wired Systems
Wireless systems dominate the DIY market because they're dramatically easier to install. You skip running cables through walls and can relocate cameras whenever needed. Battery-powered wireless cameras offer the most flexibility but require regular charging.
Solar-powered wireless cameras solve the battery problem. The Solar Cam Pro 3.0 charges continuously during daylight hours. Even three days of rain won't drain the battery. This makes them perfect for hard-to-reach mounting spots where changing batteries would be difficult.
Wired systems provide constant power and slightly faster video transmission. However, installation requires running cables from each camera to a central recorder. Unless you already have wiring in place or enjoy complex projects, the wired security camera system adds unnecessary installation challenges.
For most homes, wireless solar-powered cameras offer the best balance. You get reliability without monthly battery changes or complicated wiring.
Important Features to Consider
Video resolution determines how clearly you can see faces and license plates. Standard 1080p provides adequate detail for most situations. The high resolution security camera options at 2K or 4K capture even finer details but require more storage space.
Night vision quality varies dramatically between systems. Infrared night vision produces black and white footage. Color night vision uses ambient light or spotlights to maintain color images after dark. KeldCo's color night vision helps identify vehicle colors and clothing details that infrared misses.
Storage options include cloud storage or local SD cards. Cloud storage lets you access footage from anywhere but often requires monthly fees. Local storage keeps your videos private and free but requires occasional card management. The best DIY systems offer both options.
Smart detection filters out unnecessary alerts. Person detection ignores animals and cars. Vehicle detection tracks cars in your driveway. Package detection alerts you when deliveries arrive. These features reduce alert fatigue and help you focus on real security events.
Two-way audio lets you communicate through your cameras. Warn package thieves, greet visitors, or calm scared pets when you're away. This feature transforms cameras from passive monitors to active security tools.
Weather resistance matters for outdoor cameras. Look for IP65 or IP67 ratings that handle rain, snow, heat, and cold. KeldCo cameras function from -4°F to 122°F, covering even extreme climates.
Feature Comparison:
| Feature | Essential | Nice to Have | Skip If Budget-Tight |
|---|---|---|---|
| 1080p Video | Yes | - | - |
| Night Vision | Yes | - | - |
| Solar Power | - | Yes | - |
| Motion Zones | Yes | - | - |
| Two-Way Audio | - | Yes | - |
| Cloud Storage | - | - | Yes (use local SD) |
| Color Night Vision | - | Yes | - |
| AI Detection | - | Yes | - |
Top KeldCo Models for DIY Installation
Solar Cam Pro 3.0 represents the newest technology with enhanced AI detection and 2K resolution. The improved solar panel charges 30% faster than previous models. Setup takes just 10 minutes because everything pairs automatically. This model excels for homes wanting the absolute best features without monthly costs.
Solar Camera Pro 2.0 4G works anywhere, even without WiFi. The built-in 4G connection makes it perfect for remote properties, RVs, or construction sites. You don't need internet service where the camera is located. Just insert a SIM card and the camera connects to cellular networks. Great for monitoring vacation homes or areas where WiFi doesn't reach.
Solar Camera Pro 3.0 WIFI balances advanced features with value pricing. You get the same excellent video quality and solar charging as the Pro 3.0 in a more affordable package. The WiFi-only design works perfectly for typical homes with good internet coverage. Most buyers find this model provides everything they need.
For small businesses, KeldCo's business CCTV systems scale up to provide comprehensive coverage with professional features like continuous recording and advanced analytics.
What Is the Best Cheapest Home Security System?
Budget-friendly doesn't mean sacrificing quality. The best affordable DIY security systems provide reliable monitoring without expensive hardware or recurring fees. You can protect your home effectively for under $500 including multiple cameras.
Finding Value Without Compromising Safety
Start with the essential cameras you need rather than buying more than necessary. A 4 camera security system covers the typical home's entry points. Add cameras later if you identify gaps in coverage.
Solar-powered cameras save money over time by eliminating battery replacement costs. Standard batteries cost $10-20 per set and need changing every 3-6 months. Over three years, battery costs can exceed the original camera price. Solar power pays for itself.
Skip expensive monthly monitoring services by choosing systems with app-based monitoring. You become your own monitoring center, receiving instant alerts when motion triggers. Most break-ins happen during daytime hours when you can respond immediately.
Free cloud storage or local SD card recording eliminates ongoing storage fees. A 128GB SD card stores weeks of motion-triggered clips and costs less than one month of cloud service. KeldCo cameras support both options, letting you choose what works for your budget.
Cost Comparison: DIY vs. Professional
Professional installation costs $500-1,500 on top of equipment prices. DIY installation is free except for your time. Equipment quality between DIY and professional systems has largely equalized, with DIY options often using newer technology.
Monthly monitoring fees range from $20-60 with professional systems. Over a five-year period, that's $1,200-3,600 in recurring costs. DIY self-monitoring costs nothing monthly while providing the same alerts and video access.
Contract commitments lock you into professional services for 2-5 years. Cancellation fees can reach several hundred dollars. DIY systems have no contracts or cancellation fees. You're free to change or upgrade whenever you want.
Cost breakdown over 5 years:
Professional System:
- Equipment: $1,000
- Installation: $800
- Monthly monitoring (5 years): $3,000
- Total: $4,800
DIY System (KeldCo):
- Equipment: $400-600
- Installation: $0 (yourself)
- Monthly fees: $0
- Total: $400-600
The savings speak for themselves. Professional systems cost 8-10 times more for similar protection.
What Is the Best DIY Security System Without Monthly Fee?
Systems without monthly fees give you complete ownership and control. You decide what footage to keep, who can access your cameras, and how long recordings are stored. Privacy stays in your hands rather than on someone else's servers.
Top No-Subscription Systems
KeldCo cameras operate completely subscription-free. Your footage saves to SD cards inserted in each camera. For cloud backup, KeldCo offers optional cloud storage without forced subscriptions. You can use it when needed and stop anytime.
The continuous recording security camera options provide 24/7 recording to local storage. This captures everything, not just motion events. A 256GB card stores approximately one week of continuous 1080p footage before overwriting oldest recordings.
Local storage also protects you from internet outages. If your connection drops, cameras continue recording to their memory cards. When internet returns, you can access everything that happened during the outage.
How No-Fee Systems Save Money
Typical security subscriptions cost $10-30 monthly per camera or $20-60 for whole-home plans. A four-camera system with individual subscriptions costs $480-1,440 annually. That's money you'll spend every single year you own the system.
Without subscriptions, your only costs are the initial camera purchase and occasional SD card replacements. SD cards last 2-3 years with normal use and cost $15-40 for quality high-capacity cards. That's under $20 yearly versus hundreds for subscriptions.
The Solar Camera Pro 3.0 WIFI eliminates even electricity costs. Solar charging means zero ongoing expenses for power. Your security system literally costs nothing to operate after the initial purchase.
If you value specific features like extended cloud storage for extra peace of mind, understand that's entirely optional with KeldCo. Their self monitoring security system approach puts you in control.
How Can I Secure My Home Cheaply?

Effective home security combines multiple layers of protection. Cameras form just one part of a comprehensive strategy. Smart placement, visible deterrents, and good habits work together to keep your property safe without spending thousands.
Maximize Security on a Budget
Start with entry point cameras covering all doors. Front door cameras deter package theft and capture visitor faces. Back door cameras monitor your most vulnerable access point since burglars prefer hidden entries. Side door or garage cameras complete basic coverage.
The window security camera placement helps monitor ground-floor windows, another common entry point. You don't need cameras on every window. Position cameras to capture anyone approaching multiple windows from different angles.
Motion-activated lights dramatically improve security for minimal cost. Bright lights startle intruders and make them visible to neighbors. Solar-powered motion lights cost $20-40 each and install without wiring. Place them near all entry points and dark corners.
Reinforce door security with longer strike plate screws, deadbolt locks, and door jammers. These upgrades cost under $100 total but make break-ins significantly harder. Most burglars give up after 60 seconds of attempting entry.
Visible security signs and camera decals deter casual criminals. Real cameras provide actual protection while signs warn potential intruders that your home has active monitoring. This combination makes criminals choose easier targets.
Smart Placement for Maximum Coverage
One well-placed camera can monitor multiple areas. Corner mounting provides views down two sides of your home simultaneously. High mounting (9-10 feet) gives cameras wider angles and protects them from tampering.
Angle cameras slightly downward to capture faces rather than hat tops. The goal is clear identification, not just motion detection. Test angles using your app's live view before final mounting.
Overlapping camera views eliminate blind spots. If one camera captures someone approaching a door, another should catch them from a different angle. This provides multiple identification opportunities and backup if one camera fails.
For extra features, consider adding a PTZ security camera at one key location. Pan-tilt-zoom cameras let you remotely control viewing angles and zoom in on suspicious activity. They're pricier but provide incredible flexibility for monitoring large areas.
The 360 degree security camera offers another advanced option for complete area coverage with a single device. These work especially well for monitoring yards or parking areas.
Budget security checklist:
- Entry door cameras (minimum 2)
- Motion-activated lights (4-6)
- Visible security signage
- Reinforced door hardware
- Timers on indoor lights when away
- Maintained landscaping to eliminate hiding spots
Wrapping Up Your DIY Security Decisions
The best DIY security system protects your home without complicated installation or ongoing expenses. KeldCo's solar-powered cameras deliver professional security that anyone can install in an afternoon. You get instant alerts, crystal-clear footage, and complete control over your security.
Most homeowners find that DIY security exceeds their expectations. Setup is simpler than anticipated, video quality impresses, and self-monitoring provides faster responses than traditional monitoring services. The money you save pays for additional cameras or other home improvements.
If you're ready to secure your home, start with a quality system from a reliable brand. KeldCo's proven track record and excellent support make them the clear choice. Whether you need basic monitoring or advanced features, their systems scale to meet your needs without breaking your budget. Your family deserves protection, and now you can provide it yourself!
For more information on related security topics, explore these helpful resources:
How to Install Security Cameras
Where to Place Security Cameras
Frequently Asked Questions
Choosing a DIY security system raises common questions about installation difficulty, costs, and effectiveness. These answers help you make informed decisions about protecting your home.
What is the best DIY home security system?
KeldCo's Solar Cam Pro 3.0 ranks as the best DIY home security system because it combines easy wireless installation, solar power, 2K video quality, and zero monthly fees. The system provides professional-grade monitoring without professional costs.
Most homeowners complete installation in 30 minutes per camera. The mobile app guides you through setup with clear instructions. You get instant motion alerts, two-way audio, and color night vision. Everything works without subscriptions or contracts, making it perfect for budget-conscious homeowners who want reliable security.
Can I set up my own security system?
Yes, modern DIY security systems are designed for self-installation with basic tools and no special skills required. Wireless cameras mount with simple brackets, solar panels eliminate wiring concerns, and apps walk you through connection steps.
The typical installation requires only a drill, screwdriver, and ladder. Most people complete a 4-camera system in 2-3 hours. If you can hang pictures and use a smartphone, you can install a security system. KeldCo provides detailed video tutorials and customer support if you need help.
What is the best cheapest home security system?
KeldCo's Solar Camera Pro 3.0 WIFI offers the best value with professional features at budget-friendly prices. You get solar charging, 1080p video, motion detection, and smartphone monitoring for under $150 per camera.
Four cameras protect most homes adequately, bringing total costs under $600. There are no monthly fees, installation costs, or contracts. Over five years, you save thousands compared to professionally monitored systems while maintaining the same level of protection.
What is the best DIY security system without monthly fee?
KeldCo systems provide the best no-subscription security with local SD card storage and optional free cloud backup. Your cameras record continuously or on motion detection without any recurring charges.
You maintain complete control over your footage and privacy. There are no contracts to sign or cancellation fees if you change your mind. The system belongs to you entirely. SD cards cost just $15-40 and last years, making ongoing costs practically zero.
How can I secure my home cheaply?
Combine entry point cameras with motion lights and reinforced locks for affordable comprehensive security. Focus cameras on doors and vulnerable windows. Add solar motion lights for $20-40 each to illuminate dark areas.
Upgrade door hardware with longer screws and deadbolts for under $100 total. These simple improvements create multiple security layers that deter most break-ins. Visible cameras and security signs make criminals choose easier targets. This complete approach costs $500-800 and provides excellent protection without monthly fees.
